Media
In addition to offering standard survey elements like lists, sliders, radio buttons, Array also offers more in-depth media capture capabilities, allowing users to create more advanced, detailed forms. These features can all be found under the Media & More tab inside our Form Builder.
Navigating to the Media & More Tab
In order to add media to your form, you will see the toolbox on the right hand side of the form builder. You will need to select the second tab called Media & More
Embed an Image
There are two ways to embed a static image in a Array form. The first way is via the Media & More Tab in the form builder tool kit (as seen below). The second option is via the Form Elements button located down the left-hand side of your form. More can be found out about embedding different types of media with the Form Elements button by clicking here.

In order to navigate through the media and more tab to the Embed Image feature > First drag the Embed Image button and drop it in the area of your form where you want it to be located > Next you will need to click the Upload Image button on the Embed Image form element > Next choose your image from your files and press Open.
Draw Over Image
Image draw-over is a bit more unique and offers a lot of room for user customization. This option lets you upload an image that you want your users to draw or doodle over using Array’s built-in photo editor.
The photo editor has two features.
- When the icon in the bottom right corner is in the shape of a pencil, the user can doodle on the image.
- When the icon is a lowercase “a,” then they can write on the image. Click the colored circle in the bottom left corner to change the color of your cursor.
In order to navigate through the media and more tab to the Draw Over Image feature > First drag the Draw Over Image button and drop it in the area of your form where you want it to be located > Next

Images uploaded to the draw-over feature stack on top of each other, meaning responders are able to upload more than one image. To edit the image > click on the thumbnail of the photo to the right of the camera icon.
Since image draw-over fields are relatively uncommon in an online form or survey, users may not immediately understand what’s expected of them. For this reason, we recommend including some instructive text in the form itself. To do this > navigate to the Layout tab > include a Free Text field > then write a short message.
Take a Picture
The Take a Picture feature gives you the ability to collect photos in a live form. Take a Picture allows the responder to upload a picture from their own device to your form. To do this > Navigate to the Media & More tab in the Form Builder Toolbox > Then drag the Take a Picture field onto the form.

When a user opens the form, they’ll see an icon of a camera. Clicking this will launch a file uploader or the camera option on mobile devices, allowing them to add whatever photo they’d like. A user will be able to upload as many files as they need.
Draw Over Picture
Picture draw-over is a bit more unique and offers a lot of room for user customization. At first glance, this field appears very similar to the “Take Picture” field. However, once a user uploads a photo, they’ll then be able to add doodles and text to the photo using Array’s built-in photo editor.
The photo editor has two features.
- When the icon in the bottom right corner is in the shape of a pencil, the user can doodle on the image.
- When the icon is a lowercase “a,” then they can write on the image. Click the colored circle in the bottom left corner to change the color of your cursor.

In order to navigate through the Media & More tab to the Draw Over Picture feature > First drag the Draw Over Picture button and drop it in the area of your form where you want it to be located. A Take Picture element will appear.
Once the form is published, users should click the Take Picture Icon to either upload pictures from their device or activate their camera to take a photo.
After a photo has been uploaded > users should click the photos they have uploaded, which will now be surrounding the Take Picture button > then choose which ones they want to edit (as seen below).
Take Video
The Take Video feature gives you the ability to collect videos in a live form. Take Video allows the responder to upload a video from their own device to your form. To do this > Navigate to the Media & More tab in the Form Builder Toolbox > Then drag the Take Video field onto the form.

When a user opens the form, they’ll see an icon of a video camera. Clicking this will launch a file uploader or the video capture option on mobile devices, allowing them to add whatever video they would like. A user will be able to upload as many videos as they need.
Take Audio
The Take Audio feature gives you the ability to collect audio in a live form. Take Audio allows the responder to upload audio from their own device to your form. To do this > Navigate to the Media & More tab in the Form Builder Toolbox > Then drag the Take Audio field onto the form.

When a user opens the form, they’ll see an icon of a microphone. Clicking this will launch a file uploader or the audio capture option on mobile devices, allowing them to add whatever audio they would like. A user will be able to upload as many audio files as they need.
Attach Document
The Attach Document feature gives you the ability to collect files in a live form. Attach Document allows the responder to upload files from their own device to your form. To do this > Navigate to the Media & More tab in the Form Builder Toolbox > Then drag the Attach Document field onto the form.

When a user opens the form, they’ll see an icon of a paperclip. Clicking this will launch a file uploader, allowing them to upload whatever files they would like. A user will be able to upload as many files as they need.
Add a Subform
Take a look at our Subform support doc for more information.

Add a Barcode
The Add a Barcode feature gives you the ability to collect barcodes in a live form. Add a Barcode allows the responder to upload barcodes from their own device to your form. To do this > Navigate to the Media & More tab in the Form Builder Toolbox > Then drag the Add a Barcode field onto the form.

When a user opens the form, they’ll see an icon of a barcode. Clicking this will launch a file uploader, allowing them to upload whatever barcodes they would like. After they upload their barcode, a green button will appear at the bottom of the icon to let them know the upload is complete.
Add a QR Code
The QR Code feature gives you the ability to collect QR Codes in a live form. QR Code allows the responder to upload a QR Code from their own device to your form. To do this > Navigate to the Media & More tab in the Form Builder Toolbox > Then drag the QR Code field onto the form.

When a user opens the form, they’ll see an icon of a QR Code. Clicking this will launch a file uploader, allowing them to upload whatever QR Codes they would like.
Add OCR scanner
The Add OCR element allows users to scan text or images with text within them on a live form.
To do this > Navigate to the Media & More tab in the Form Builder Toolbox > Then drag the OCR element onto the form.

When a user opens the form on the mobile app, they will see the OCR icon.
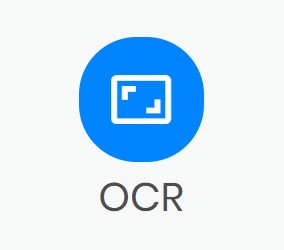
Once pressed, the element will load up the user’s camera so it can scan the text or image.
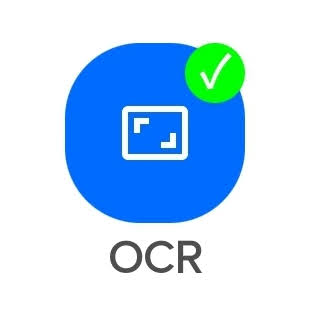
After they upload their OCR but clicking ‘Save’ at the bottom of the page, a green tick will appear at the top of the icon to let them know the upload is complete.
Once the form has been submitted, the scanned text will display on the submission
Add GPS
The GPS feature allows your live forms to collect the exact locations of the users.
To do this > Navigate to the Media & More tab in the Form Builder Toolbox > Then drag the GPS field onto the form.

When a user opens the form, they’ll see an icon for GPS. Clicking this will launch a map, allowing them to upload their current location.
Add a Product + Add a Product Total
Have a look at Add a Product for further information on this elements.
Related Articles
Toolbox Options
The form builder’s toolbox contains all the various data field types a Array form can hold. The form builder’s toolbox contains all the various data field types a Array form can hold. In this article, we provide a brief explanation of the various ...Add a Product
How to add a product into your Array forms. This section will show you how to add a product into your Array forms. The adding a product feature can be used for a variety of reasons, however, the most common use for this feature is to offer a product ...Form Builder
Here is where you design and edit your forms. The form builder is where you can design and edit your forms in Array. The form builder also contains all the information for that specific form such as any submissions and all the sharing option. In this ...Logic
It’s nothing more than a set of rules that determine whether or not an input field will be made visible to a responder. When it comes to filling out forms, not all responders are created equal. You may find that relevant information about one type of ...Subform
Subform allows you to repeat elements within your forms and users to fill in the same information several times. Subform is a great addition that allow you to repeat elements without making your forms bigger than they need to be. In this article ...