Toolbox Options
The form builder’s toolbox contains all the various data field types a Array form can hold. In this article, we provide a brief explanation of the various options and how they function.
The Toolbox appears down the right hand side in the form builder.

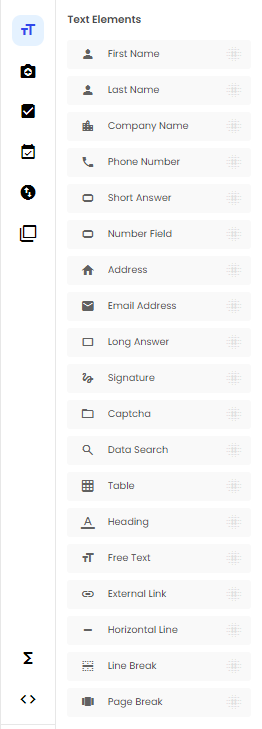
Text Elements
The Text Elements options are very straightforward. If you’d like to capture a responder’s name, email, company, or phone number, simply drag and drop the corresponding field onto your form. Additionally, you can use the signature option to allow a responder to add a handwritten signature to the form.
At the bottom of the Text Element menu, you’ll see a “Data Search” field. This field allows you to populate a form with information found in the Array database, in an external CSV, or in a third-party application. For more information on data search here.

Media & More
Use options from the Media & More menu to allow responders to attach photos, videos, audio files, or documents to your Array form. You can also generate barcodes and QR codes from this menu.

Lists / Sliders
The Lists / Sliders options are great for letting form responders compare multiple pieces of data.
Radio List: Choose only one answer from several possibilities. See our article for the different option on the Radio List.
Check Box List: Choose as many answers as apply from a list
Drop Down: Choose one answer from a drop-down list
Star Rating: Apply a score to an attribute on a scale of 1-5
Numbered Slider: Apply a score to an attribute on a scale of 1-10
Numbered List: Rank a list of options in order from best to worst
Countries, States, & Options: Select a country, state, or country from a drop-down list.

Date / Time
The Date / Time menu contains four simple options: Add a date to your form, add a time, add both and add a Booking.

Integrations
The integrations section is where you can add fields that will share data with an external application, such as MailChimp or Base CRM. To add an integration, visit the Array Market.
Click here to read more about Array integrations.

Template
The template tab has all your saved groups which can be dragged on your form. To see how to create these group - click here.

Toolbox Element Settings
When using the elements from the toolbox, each element has it own settings you can customise. When drag or highlight an element, the toolbox will change to the settings menu

Related Articles
Form Builder
Here is where you design and edit your forms. The form builder is where you can design and edit your forms in Array. The form builder also contains all the information for that specific form such as any submissions and all the sharing option. In this ...Field Templates
Field templates are a great way of grouping all your favourite or most used elements together Field templates are a great way of grouping all your favourite or most used elements together and gives you the ability to drag more than one element at ...Radio List
Give users the ability to show the radio list in several different ways. The radio list element has been given more customisable options to give users the ability to show the radio list in several different ways. In this article we’ll be showing you ...Intelligence
Intelligence is a great automation tool to use within forms assigning certain actions to automatically create or update records. Intelligence is a great automation tool to use within your forms. You are able to assign Intelligence to certain actions ...Data Search
Array's data search feature can help clear the air. It's easy to imagine situations where you may already have information about someone interacting with your Array forms. Perhaps you're hosting a marketing event and you want to check whether or not ...