Functions
Functions is a great addition which allows you to add text, formula or value functions into your Array elements allowing user to populate one or more fields with any of the functions.
In this article we’ll be showing you:
- How to find and set up your first function
- Applying your function to an element
- Text Functions
- Formula Functions
- Value Functions
Finding Functions
Functions has been given its very own tab on the form builder toolbar. This tab is located in bottom right hand corner of the form builder.

Clicking on the button will open the functions tab, which is where you can create your functions.

To set up a function, you need to click on the plus button in the top right of the functions, this will reveal ‘Text’, ‘Formula’ or ‘Value’.

Click on the function you wish to use and now your function is ready to set up. You’ll need to give your function a name so you can find in the function toolbar later.
Depending on you selected function, you now have several options for what you want your function to do.
- Form Field Value – this allows you to populate information from one field which you select in your function to others. (Available in all)
- Variable Value – this allows you to select from your already created function (Available in Sum or Text)
- Fixed Value – this allows you to set a value in an element. (Only available in Sum)
You can add to your functions by clicking the plus button on your function and you can delete your function by clicking on the rubbish bin then the tick button.
Applying your functions to an element
Any created function will now appear in the top toolbar when you select an element. To see if you can add a function to an element, you’ll need to click on an element and make sure it is highlighted
Then on the right hand side of the page, you’ll see the function options.

Once you have published your form you will see the function icon in any elements that have a function applied to them.
A Text Function
The text function allows a user to populate text elements with text entered in your selected field and also link 2 or more fields so it populates in 1 field. To set up a text function, select the function tab then click on the plus button then text.

Text functions allow you to select from a ‘Form Field Value’ or 'Variable Value’.
When a name is entered into this function it is colour coded dark blue. When you click the plus button on this function you can add any join text and then selected from a ‘Form Field Value’ or Variable Value’ again, this can be repeated as many times you need it.
Example of a text function
Your Array form may require users to enter their name in several place so to save your user time a text function can be set up to link all the name elements. To do this set up a text function then select ‘Form Field Value’ and select form field called Name.
To apply this function to the other name elements, click on your element and make sure it is highlighted
On the right hand side of the page, you’ll see the functions options, select your function called ‘Name’ and this will apply the function to this element.

Now when a user fills in their name in the top name element, the other will populate their name.
Formula Functions
The formula function allows a user to populate number elements with number entered in your selected fields and also calculate the sum of 2 or more numbers in one field. To set up a formula function, select the function tab then click on the plus button then sum.

Formula functions allow you to select from a ‘Form Field Value’, ‘Variable Value’ or ‘Fixed Value’
When a name is entered into this function it is colour coded light blue. When you click the plus button on this function you can add ‘Add’, ’Subtract’, ’Divide’ or ’Multiply By’ and then selected from a ‘Form Field Value’, ‘Variable Value’ or ‘Fixed Value’ again, this can be repeated as many times you need it.
Example of a formula function
One of your Array forms may need to add up several number and give a total of these numbers so using the formula function will allow you to get the function to add up all the numbers and present the sum of all the number in one field.
To do this set up a sum function then select ‘Form Field Value’ and select form field called Number 1, then click on the plus button on this function then select ‘Add’. In the next section of the function you need to select ‘Form Field Value’ and select form field called Number 2.
To apply this function to your total element, click on your element and make sure it is highlighted
In the top toolbar you’ll see the functions options, select your function called ‘Sum’ and this will apply the function to this element.

Now when the user fills in both of these field with numbers, a total will present in your total field.
Value Functions
The value function allows users to allocate a ‘Radio List’ ‘Check Box List’ and ‘Drop Down’ element with a number or link linked to the response of the element. To set up an answer function, select the function tab then click on the plus button then answer.

Value functions allow users to select from the following options:
- Form Fields – The element users want to allocate the answers to
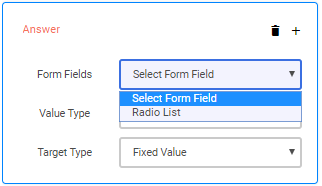
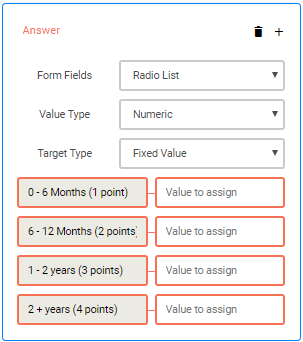
Once the element is selected it will populate the elements option in the function box to allow users to allocate the text or number.
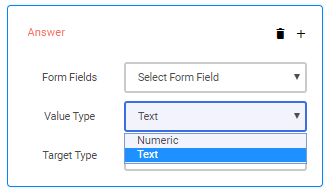
- Value Type – Users can select whether the answer is a Text or Numeric
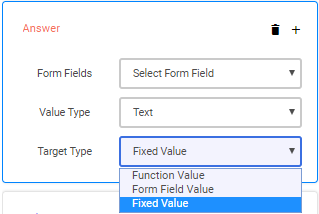
- Target Type – Allows users to select whether the answer allocated is a fixed value, a function value or form field value.
When a name is entered into this function it is colour coded red. When you click the plus button on this function, you can join another element to give you either all the text answers together or a total of 2 numeric answers together and this can be repeated as many times you need it.
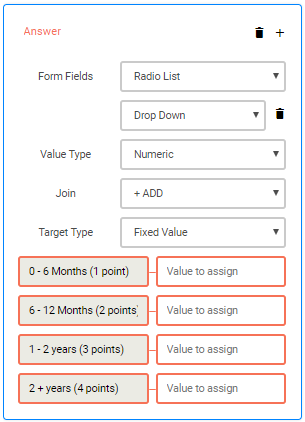
Example of an value function
One of your forms may be a survey or checklist which allocates each question’s answer with a fixed number. To do this, set up an value function for each element you want to allocate a number to. In this example we have named them ‘Answer’ and ‘Answer 1’ with a Radio List and Drop Down elements.
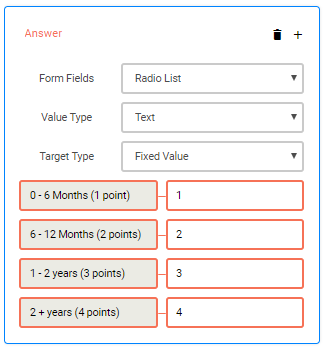
Once you have allocated the answer with numbers, you need to display this in an element on your form. You can drag a ‘Short Answer’ or ‘Number Field’ element on to your form then highlight the element. 
then on the right hand side of the page, select ‘Answer’ or ‘Answer 1’ so the number allocated to your answer will show when selected whilst filling in the form.

Now when the user selects the options from the elements it will display on the form.
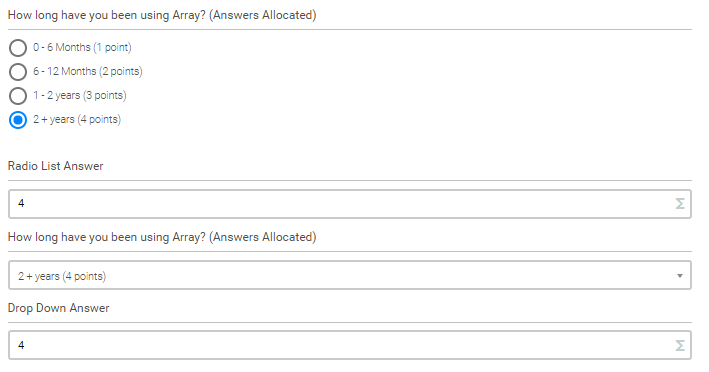
An example form with all functions
Have a go with an example form we have built below to see how the functions work on the App.
Related Articles
Form Settings
How to use the wider range of functions that can be found in the settings cog of your form. This section details how to use the wider range of functions that can be found in the settings cog of your form. These settings are designed to enable you to ...Form Builder
Here is where you design and edit your forms. The form builder is where you can design and edit your forms in Array. The form builder also contains all the information for that specific form such as any submissions and all the sharing option. In this ...Intelligence
Intelligence is a great automation tool to use within forms assigning certain actions to automatically create or update records. Intelligence is a great automation tool to use within your forms. You are able to assign Intelligence to certain actions ...