Email Automation: Email Copy & Email Logic
What Is The Email Copy Function?
Sending a copy of your completed form by email to either the respondent themselves or a different admin can prove to be extremely advantageous. For example, if you wish the results of a form to be moderated by an independent user send an email copy of the form. Likewise, if you wish to send proof of purchase to your customer after a transaction, automatically set up the email copy function.
In this article, we'll show you:
- how to create an email copy
- how to set up email logic
How To Create Email Copy
Once you have built your form, you’ll want to click on 'Connect' at the top of the form builder.

From here you will need to select Automation on the right hand side of the page.

Click the 'Add' button located on the top right of the screen.

Next, you will need to enter;
Email Copy Name - The title of the email copy of the completed form (if you choose to include it)
Send on - When should the email be sent, either 'Response Submitted', 'Response Updated' or both.
Sender Email - What address will the email come from. By default, this will be admin@buildarry.com. If you want a custom one, please contact us.
Sender Name - What you would like the sender's name to be i.e Array
Email Theme - (The theme you have previously created) This is the theme and content of your customized email that will be sent to your user (if you choose to by selecting the EMAIL BUTTON*), find out more about how to create email themes by clicking here
Email Subject - The title of your email (this will be the first thing your user will see when they first see your email)
Email Addresses - Any emails (usually for internal records) that you want a copy of every response sent to.
*Email Selection - If you want to send an automated customizable response to the person who completes the form (only if they have entered their email address)
The Format - The format of the copy of the completed form. To have images and documents attached which are present in your forms too, you will need to tick both of these options in your email settings for them to be included in your emails. This is where you can attach your custom Docs format as well.
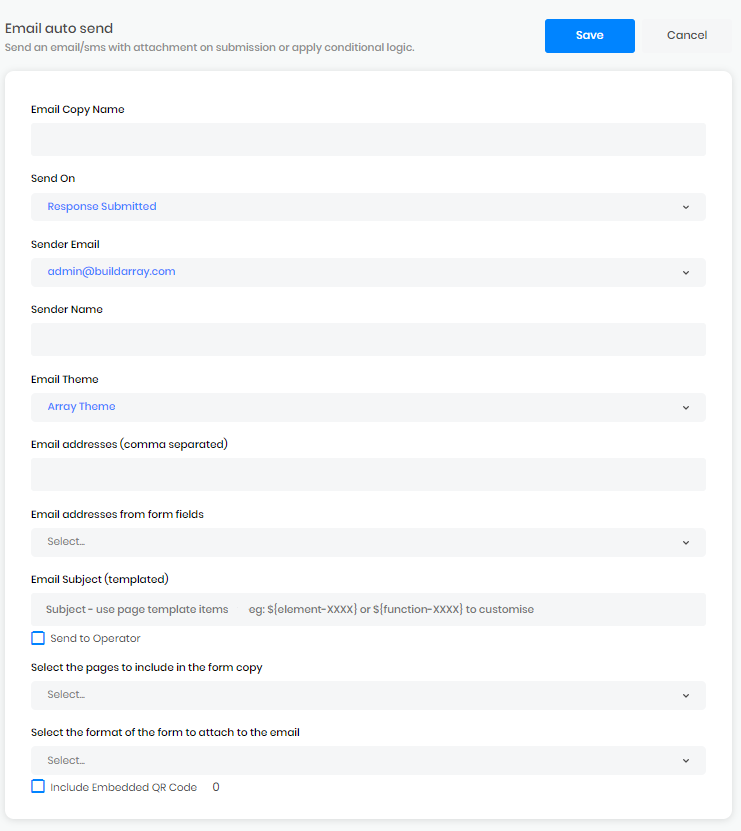
There are 2 tick boxes to select if needed:
Send to Operator - Send a copy of your chosen format to the user who submitted the form
Include Embedded QR Code - Embed a QR code into the email copy. You can add our Docs markers to embed the QR code.
Once you have done this, remember to press save, and you will now have fully automated customizable email responses to your forms.

To send out different custom emails based on different individual form responses, i.e an email for a positive response and an email for a negative response - read below to find out about email logic.
How do I Use Email logic?
It is now time to set your conditions to determine who will be sent a response email and who will not.
To do this, you’ll want to you need to find the email logic you wish to apply logic to, click on the logic icon

Click the plus button to start building your logic form

The choice of field conditions will then appear for you to set.

For example, it’s the “Fail or Pass” field, so you’ll want to select “Fail or Pass” from the drop-down box. You’ll then need to specify which values are needed to trigger the conditional field. We’ll want a Pass selection from the user to trigger an email. When these conditions are set, press Save and your email logic will now be live.
If you want to add another different response email (perhaps for a negative or positive response), choose a different email theme, and set alternative email logic.
Related Articles
Logic
It’s nothing more than a set of rules that determine whether or not an input field will be made visible to a responder. When it comes to filling out forms, not all responders are created equal. You may find that relevant information about one type of ...Form Builder
Here is where you design and edit your forms. The form builder is where you can design and edit your forms in Array. The form builder also contains all the information for that specific form such as any submissions and all the sharing option. In this ...Add a Link to a Form
Adding a link to a form could be used in multiple ways and can be great to link someone to an external source before they complete a form. Adding a link to a form could be used in multiple ways and can be great to link someone to an external source ...Intelligence
Intelligence is a great automation tool to use within forms assigning certain actions to automatically create or update records. Intelligence is a great automation tool to use within your forms. You are able to assign Intelligence to certain actions ...Add a Product
How to add a product into your Array forms. This section will show you how to add a product into your Array forms. The adding a product feature can be used for a variety of reasons, however, the most common use for this feature is to offer a product ...